Where To Nail Shingles On Roof? (Tips & Steps)
Posted: September 20, 2024
If you’re a homeowner looking to enhance your roofing skills, you’ve come to the right place! Nailing shingles in the correct spots on your roof is crucial for ensuring a durable, long-lasting finish. In this blog post, we’ll discuss where to nail shingles on your roof, offering practical tips and step-by-step guidance to make the process easy and effective.
- Why Proper Nailing is Important
- Preparations
- How to Nail Shingles on a Roof in 7 Steps
- Common Mistakes to Avoid
- Maintenance Tips
🤔 Why Proper Nailing is Important
Nailing shingles correctly is vital for the longevity and effectiveness of your roof. Poorly nailed shingles can lead to leaks, wind damage, and costly repairs down the road. Proper nailing ensures that each shingle is securely fastened, protecting your home from the elements.
Correct nailing also contributes to the overall aesthetics of your roof. A well-nailed roof looks neat and professional, enhancing your home’s curb appeal. By following the guidelines, you’ll also meet manufacturer warranties and building codes, ensuring your investment is protected.
Additionally, proper nailing can improve the energy efficiency of your home. A securely fastened roof prevents drafts and helps maintain a consistent indoor temperature, potentially reducing your energy bills.
Understanding Shingle Types
Before you start nailing, it’s essential to know the type of shingles you’re working with. There are several types of shingles, including asphalt, wood, metal, and tile. Each type requires a different approach to nailing.
Asphalt Shingles: The most common type, known for their affordability and ease of installation.
Wood Shingles: Offer a natural look but require more maintenance and specialized nailing techniques.
Metal Shingles: Durable and long-lasting, but they need precise nailing to prevent dents and damage.
Tile Shingles: Heavy and durable, often used in warmer climates, requiring robust nailing to secure their weight.
Understanding the specific requirements of your shingles will help you choose the right nails and nailing technique, ensuring a successful roofing project.
🧰 Preparations
Knowing how to be well prepared for installing roof shingles is crucial for a successful DIY project. Proper preparation ensures you have the right materials and tools, minimizes mistakes, and enhances the longevity and effectiveness of your roofing work.
Essential Tools and Materials
Having the right tools and materials is crucial for nailing shingles effectively. Here’s a list of what you’ll need:
Tools:
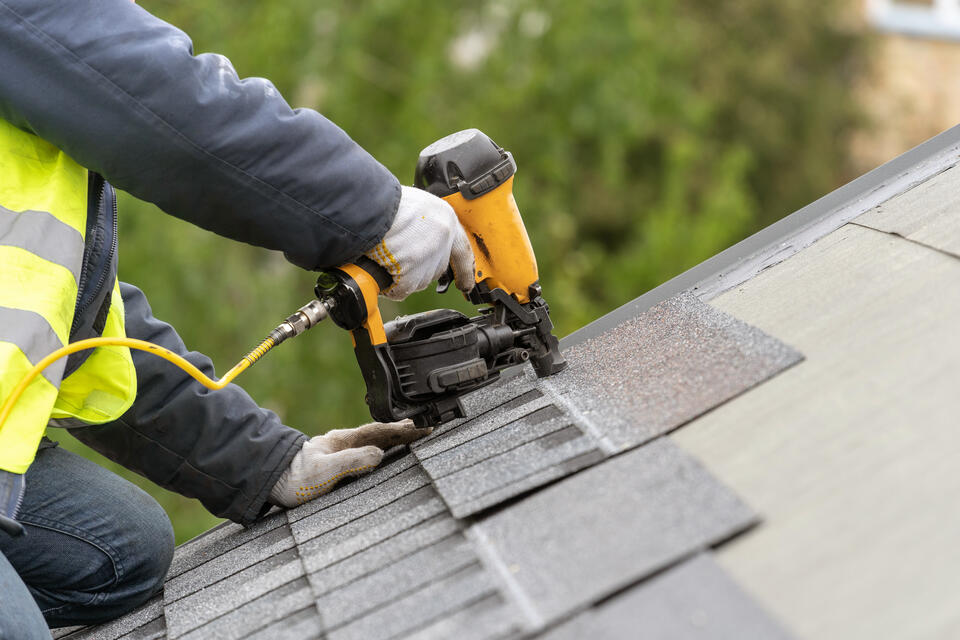
- Hammer or roofing nailer
- Tape measure
- Chalk line
- Utility knife
- Ladder
- Safety gear (gloves, goggles, harness)
Materials:
- Shingles
- Roofing nails
- Roofing felt
- Drip edge
- Roof cement
By gathering these tools and materials ahead of time, you’ll be prepared to tackle your roofing project with confidence and efficiency.
Safety First
Safety should always be your top priority when working on a roof. Roofing can be dangerous, especially for those without experience. Here are some safety tips to keep in mind:
- Use Proper Safety Gear: Always wear gloves, goggles, and a harness when working on your roof.
- Check Weather Conditions: Avoid working in wet or windy conditions to prevent slips and falls.
- Secure Your Ladder: Ensure your ladder is stable and placed on a flat surface before climbing.
Taking these precautions will help you stay safe and avoid accidents while nailing shingles on your roof.
Choosing the Right Nails
Choosing the right nails is essential for the success of your roofing project. Roofing nails come in various lengths and materials, each suited for different types of shingles.
Length: Nails should be long enough to penetrate the shingle, underlayment, and roof deck by at least 3/4 inch.
Material: Use galvanized or stainless steel nails to prevent rust and corrosion.
Head Size: The head of the nail should be at least 3/8 inch in diameter to provide adequate holding power.
Selecting the appropriate nails will ensure your shingles are securely fastened and able to withstand the elements.
Prepping Your Roof
Proper preparation is key to a successful roofing project. Before you start nailing shingles, make sure your roof is clean and free of debris.
- Inspect the Roof Deck: Check for any damage or rot and make necessary repairs.
- Install Drip Edge: Apply a drip edge along the eaves and rakes to prevent water from seeping under the shingles.
- Lay Roofing Felt: Roll out and secure roofing felt to provide an additional layer of protection against moisture.
Taking the time to prep your roof will create a solid foundation for your shingles and contribute to the overall durability of your roof.
🔨 How to Nail Shingles on a Roof in 7 Steps
Ready to start nailing shingles? Follow these steps for a successful installation:
1. Start with a Starter Strip
Lay a starter strip at the eaves, ensuring it overhangs the edge by about 1/4 inch. This will provide a solid base for the first row of shingles, helping to create a water-resistant barrier and preventing leaks.
2. Align the First Shingle
Place the first shingle over the starter strip, aligning it with the edge of the roof. Make sure the tabs overhang the drip edge slightly to direct water away from the roof’s edge, reducing the risk of water damage.
3. Nail the First Shingle
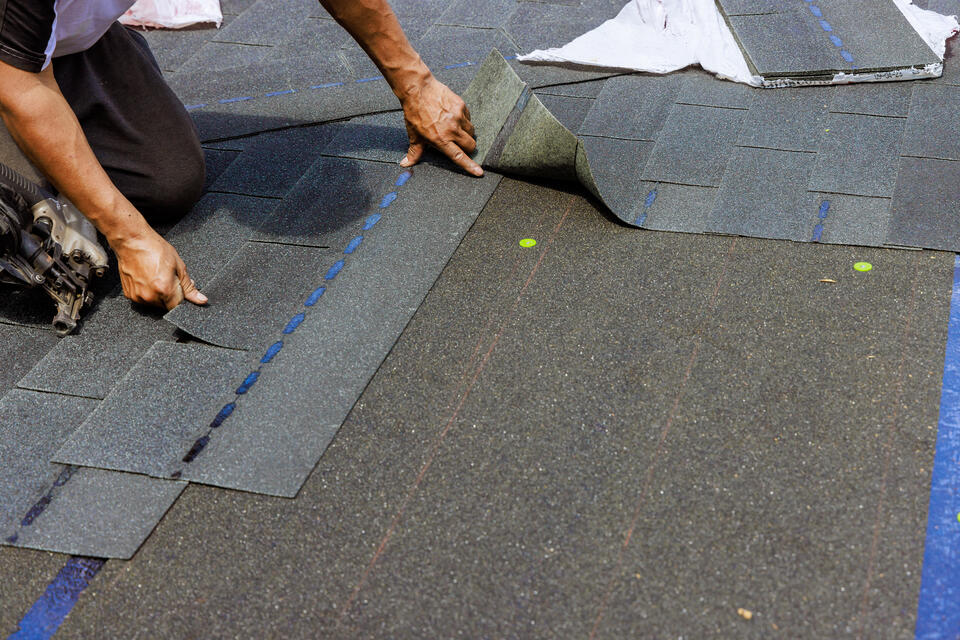
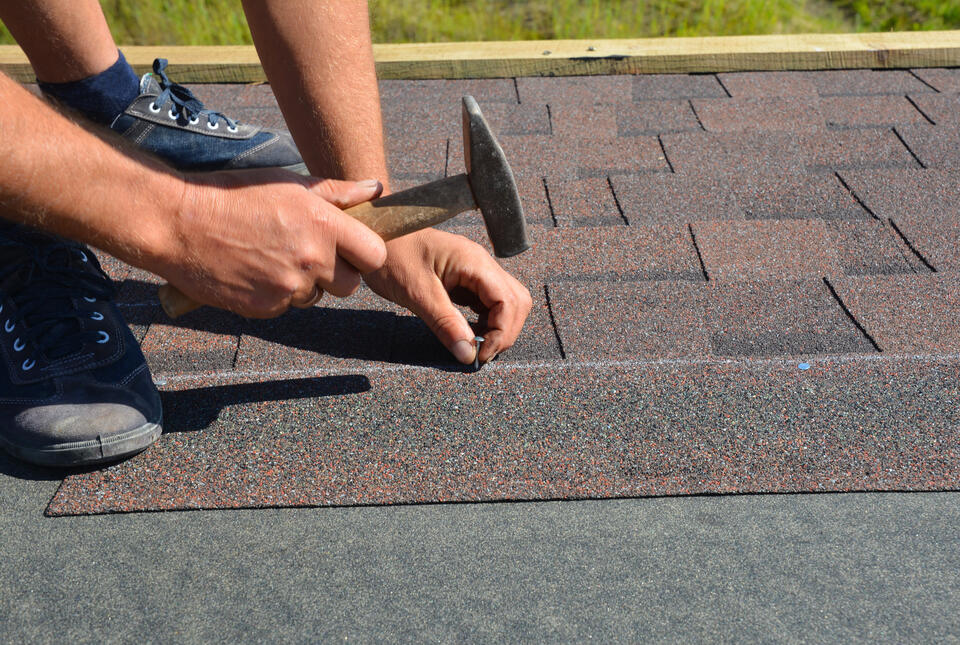
Drive roofing nails through the shingle’s nail line, placing them about 1 inch in from the edges and spaced evenly along the length. This secures the shingle firmly, ensuring it can withstand wind and weather conditions.
4. Continue Up the Roof
Lay the next row of shingles, staggering the seams to prevent leaks. Nail each shingle in place, following the same spacing and alignment as the first row. Staggering helps create a more robust roof and enhances aesthetic appeal.
5. Trim Shingles as Needed
Use a utility knife to trim shingles around roof vents, chimneys, and other obstacles. Ensure a snug fit to prevent water infiltration, as gaps can lead to leaks and compromise the integrity of the roof.
6. Cap the Ridge
Once you’ve covered the entire roof, install ridge cap shingles along the peak. Nail them in place, overlapping each piece to ensure complete coverage. This not only protects the roof but also gives it a polished, finished look.
7. Inspect Your Work
Check for any loose or improperly nailed shingles and make necessary adjustments. Ensure all nails are flush with the shingle surface to prevent damage. A thorough inspection is key to a durable roof.
- Check for Loose Nails: Ensure all nails are securely fastened and flush with the shingle surface. Loose nails can lead to shingle displacement and potential leaks.
- Look for Gaps: Inspect for any gaps between shingles that could allow water infiltration. Filling these gaps will enhance the roof’s waterproofing.
- Verify Alignment: Make sure all shingles are properly aligned and evenly spaced. Proper alignment not only improves the roof’s appearance but also its performance.
A thorough inspection will help you identify and address any issues before they become major problems, ensuring a long-lasting and effective roof.
🚫 Common Mistakes to Avoid
Even the most experienced DIYers can encounter challenges when nailing shingles. To help you achieve the best results, here are some common pitfalls to watch out for:
Nailing Too High or Low: One of the critical aspects of properly installing shingles is ensuring that nails are placed within the designated nail line of the shingle. Nailing too high can leave the shingle vulnerable to lifting and wind damage, while nailing too low might not provide adequate fastening, leading to potential leaks. Always refer to the manufacturer’s guidelines to find the optimal nailing position, and consider using a chalk line to ensure accuracy across the entire roof.
Overdriving Nails: Overdriving nails is a mistake that can have serious consequences. When nails are driven too deep, they can tear through the shingle material, compromising its integrity and effectiveness. This can lead to water infiltration and premature wear. To prevent this, use a pneumatic nail gun set at the correct pressure or a hammer to carefully drive nails until they are flush with the surface of the shingle. It’s important that you can still see the shingle’s texture and that the nails are not sunk below its surface.
Incorrect Spacing: Maintaining consistent nail spacing is crucial for even weight distribution across the roof. Incorrect spacing can cause shingles to buckle or lift, especially in high winds. The standard recommendation is to place nails about 6 inches apart, but this can vary based on the type of shingle and local building codes. To ensure precise spacing, consider marking guidelines on the roof or using a template. Consistency not only enhances the aesthetic appeal of your roof but also fortifies it against the elements, reducing the risk of damage over time.
💡 Maintenance Tips
Regular maintenance is key to extending the life of your roof. Here are some tips to keep your shingles in top condition:
- Inspect Annually: Conduct a thorough roof inspection at least once a year to identify and address any issues.
- Clean Gutters: Keep gutters clean and free of debris to prevent water backup and roof damage.
- Trim Overhanging Branches: Trim tree branches that hang over your roof to prevent damage from falling limbs and debris.
- Check for Algae and Moss: Regularly inspect for and remove algae or moss growth, as they can trap moisture and damage shingles.
- Replace Damaged Shingles: Promptly replace any cracked or missing shingles to prevent leaks and further damage.
- Ensure Proper Ventilation: Make sure your attic is properly ventilated to prevent heat buildup, which can lead to shingle deterioration.
- Monitor for Granule Loss: Keep an eye out for granules in your gutters, as their loss can indicate shingle wear.
🙌 Ensuring a Durable Roof: Trust SMR HomePros for Expert Roofing Solutions
Nailing shingles correctly is crucial to ensuring a durable and watertight roof. By following the steps and tips outlined in this guide, you can avoid common mistakes and achieve a professional finish. At SMR HomePros, our team of experienced roofing experts is dedicated to providing high-quality workmanship and exceptional customer service. With years of experience and a commitment to excellence, we ensure that your roofing project is completed efficiently and effectively. Trust us to handle your roofing needs with the care and expertise you deserve. Contact SMR HomePros today for a free consultation and see the difference our team can make in protecting your home.